Wednesday, April 18, 2012

Oh My Head!


I'm working on a tutorial for a 6 color woven ribbon headband and managed to stumble through my first one. It's loose and the weave has errors where I goofed, but overall it's passable.
I'm a little picky about my headbands as most are too tight and bug the heck out of me. So I was really bummed to discover that these were "those" headbands. Darn! Well, not much I can do about the one already made but at least I can fix the others I bought. I tried a trick knitters use to uncoil their circular needles and darn if it didn't work:)

So if you’ve ever wished those darned headbands didn’t give you a headache, here’s a quick solution.

The headband on the left is how it came from the store. I reshaped it to the one on the right.

Boil water on the stove (not microwave) in a pot big enough to give your headband plenty of room. You need a full, rolling boil.

Grab the headband with some tongs and dip one side into the boiling water. Keep it moving and don’t allow it to touch the bottom of the pan. I use a kind of rocking motion, submersing the headband from tip to center point, kind of rolling back and forth.

Keep a good eye on the tips, in about 20-27 seconds you’ll see the curve relax. Don’t look away while you’re doing this or you’ll miss it. Repeat the process for the other side.

And I couldn't resist trying it on my completed one too. I did take the precaution of putting binder clips on the ends just in case the glue loosened. I'm pretty sure boiling water will make the hot glue gun stuff fail, but I use E6000 and it seems to be staying. I'll leave the clips on until it dries.

Just 'cause I don't want anyone to ruin a hairband they love - consider if whatever your hairband is decorated with can withstand being plunged into boiling water for a couple of minutes before you try this on a completed one. The finished one I did was made with only grosgrain ribbon, and in my case it wasn't something I was going to be able to wear unless I could get it to relax. In other words, I wasn't losing anything by trying.

Friday, April 6, 2012

Sugar Easter Eggs

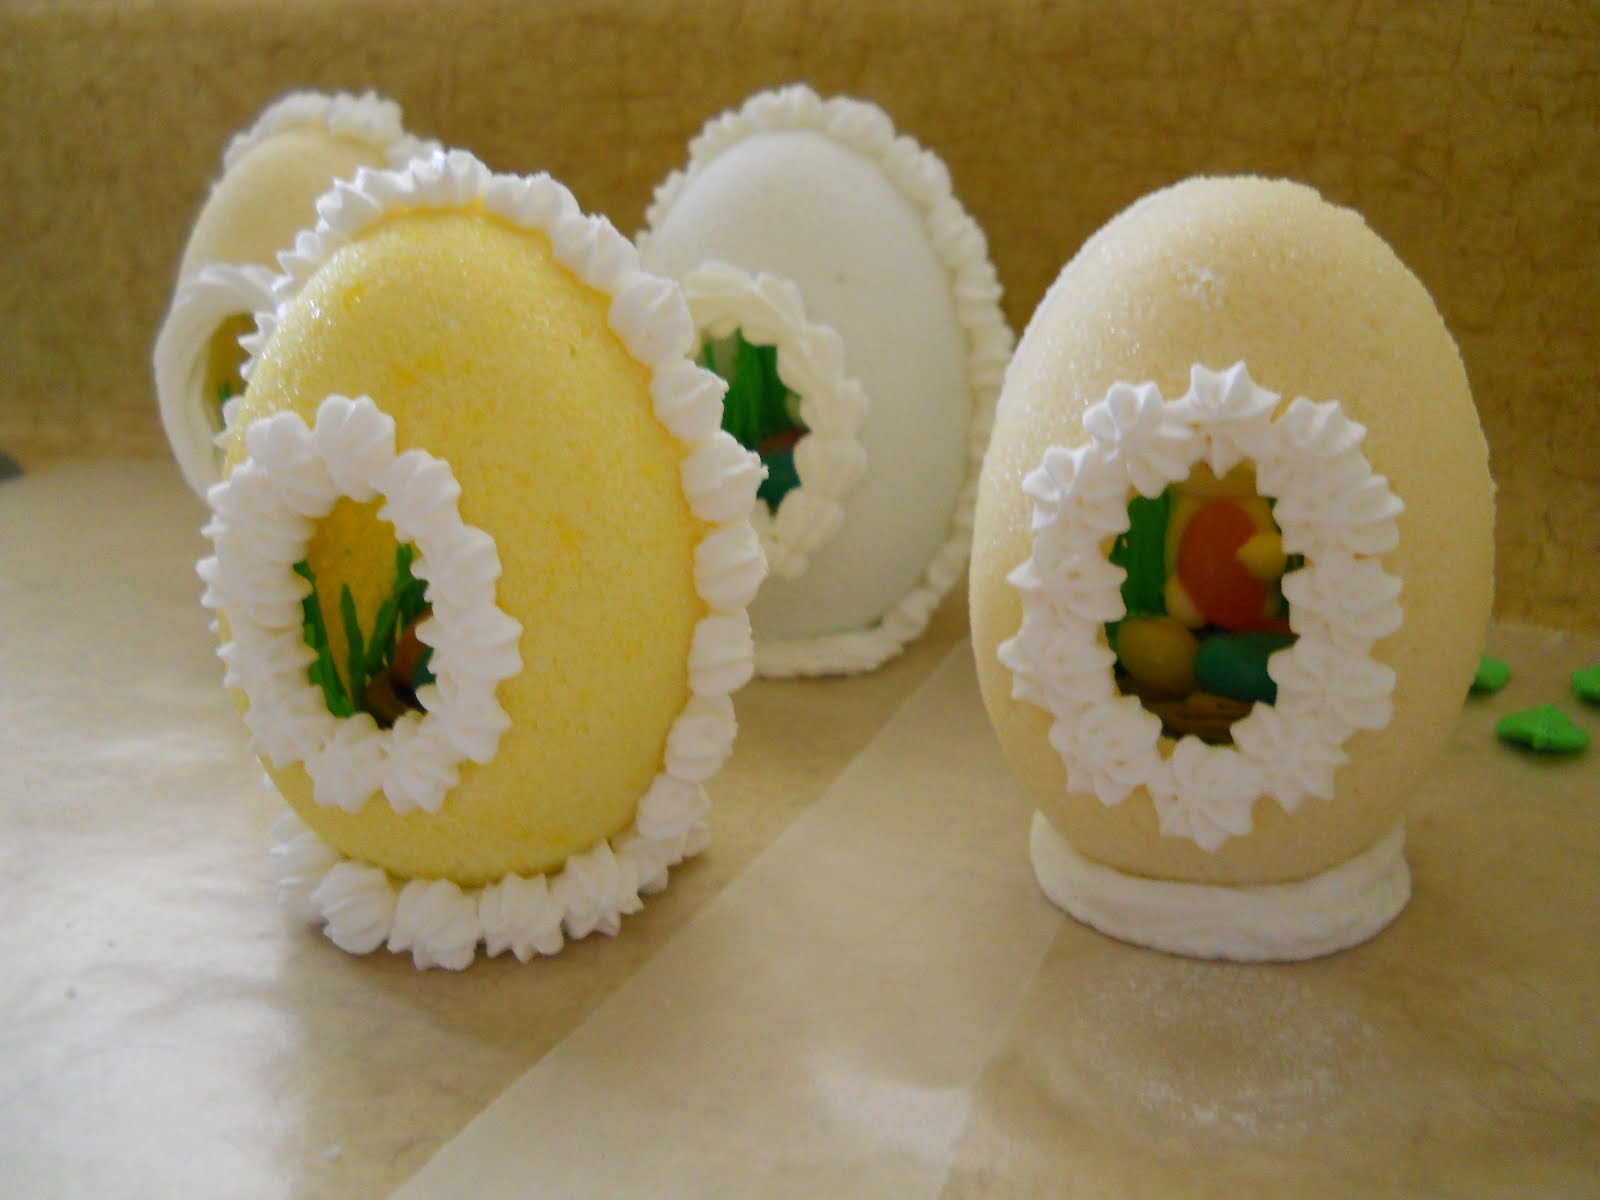
Many, many, MANY years ago someone gave me a panoramic Easter egg. To be honest, I can’t even remember what color it was or what Easter scene was inside, but I do still get that sense of awe and wonder when I think of it. To my young eyes it was just so pretty and so intricate that it had to have come directly from the Easter Bunny himself. I always have to try making anything I see and I tried making some of my own sugar eggs as a teen. Unfortunately the humidity in my beloved tropical trade winds meant that carving out the inside was like, well, walking on eggshells. I did manage to finally get a completed sugar egg shell, but I never knew how to go from there and so the idea was abandoned.

Decades later and I’ve just completed a basic cake decorating class. There have been a few projects that have stalled over the years because I can never make that darn icing do what I want. I finally gave up trying to teach myself and signed up for the Wilton beginner class. Now I know that the leaf tip I’ve been trying to use was more than half my problem. So I thought I’d try the sugar eggs again. Maybe this time someone other than the trash guys will see them:-)

The sugar mixture I used I found on the internet, afraid I don’t remember where. It’s One egg white, 3.5 cups of granulated sugar and 1/2 cup of powdered sugar. Beat the egg white really good then add the sugars and mix well. It’ll be like wet sand. I tried food color for a yellow, then switched to the gel colors. I packed in my sugar mixture good and tight, leveled it off with the back of a table knife and turned the egg halves out onto a foil lined cookie sheet to dry for a bit. When I went to scoop out the insides I discovered that the eggs had dried from the outside in, leaving a soft center which was easily removed. I used my metal measuring spoon to take out all the soft sugar and when it started scraping on the inside I knew I was done. SOOOOO much easier than in high humidity!

For curiosity’s sake I noted the drying time before scooping out the insides. You can see in the picture that waiting just one hour gives you a pretty thin shell. As the day wore on and got warmer a one hour drying time resulted in a thicker shell anyway. So temperature & humidity levels make a big difference!


The mold I used was intended to have a flat side for the completed egg to sit on. I wanted a vertical egg so I carved out a view hole using the flat part as a guide. Turns out that if you put one drop of water where you want the hole to be it will eat away at and soften the sugar. I scraped at it with a serrated paring knife until I got all the way through, then just kept scraping at the edges of the hole to enlarge and shape it. The trick is to scrape off a little at a time or you risk cracking the shell.

I’m not all that great at icing yet, but there are all kinds of pre-made royal icing decorations out there. There was this great bunny at Michael’s but apparently I waited too long to grab them - all gone by the time I went back. I did find some alternatives though and I think they’re pretty cute too.

I made up a batch of royal icing using the Wilton recipe, which is so simple I’ll just repeat it here: One 1lb box of powdered sugar, 3 tablespoons of meringue powder and 5 tablespoons of water (6 if you are using a hand mixer). I literally dumped the ingredients into my stand mixer, attached the whisk beater thing and let it run at high for 7 minutes. Of course, I did start off slow so I wouldn’t spray powdered sugar all over the kitchen... The icing got bigger, thicker and much whiter by the end of the 7 minutes. I scooped out about a cup and tinted it green and put the rest in an air tight container for now. I did have to thin my green icing a bit, added about 1/2 teaspoon of water. I loaded it all into a bag fitted with what I call the “grass” tip. It’s number 233. Just so you know, I love royal icing from a clean up stand point. Buttercream is most definitely not fun to clean out of tips or bags but royal icing pretty much just dissolves away. “Class” buttercream is made entirely with crisco and tastes icky anyway (sorry Wilton). I’m going to eventually try making buttercream frosting with actual butter to see if that helps the taste. So anyway, the only drawback to royal icing I can see is that it dries in the tip super quickly. Turns out even more quickly in the grass tip because of all the small holes. I ended up putting the tip under running water to clear it after every egg half.

First thing I did was pipe a bunch of grass in the back half of the egg. Then a kind of mound in the middle to set my little pre-made nest in. The pre-made bunny sits just behind the nest and is held in place by the grass in the back. Then on the front half I put more grass so when you look inside it doesn’t all just cut off.


Then I used a round tip and white icing to go aro und the e dge of the back half and “glue” the front half to it. You want to press the halves together pretty firmly, but no pinpoint pressure by the view hole please! I cupped both halves with my hands and tried to push evenly. Run your finger around the seam to wipe off or squash in any icing that’s oozed out.


I tried a few different designs for the opening and this was the one I liked best. The shell border looked pretty too, but I’m not good enough yet. Repeat the design around the seam to cover up the raw edges.


Right about then I was starting to wonder how I’m going to get them to stand up. I ended up putting a blob of icing on the base and then going back and covering it with the border design. All done!


Monday, July 25, 2011

Update to Funky Little flower Looms

Turns out they're called Magic Looms and are from sometime in the 1970's. I've had a request for the instructions that came with them, so here they are:) Have fun!!

Saturday, June 11, 2011

Baffling Bias Strips

So I'm in the fabric store the other day and I ran across these nifty little gadgets.


My amused chuckle turned into an outright laugh as I got a closer look at the prices. This is bias tape, not a tool for spinning gold! The Maker itself is $99.00, plus 12 bucks for the folding tips. The rotary cutting machine is another $50.00 and the winder $35.00 on top of that! Wow, around $200.00 for something I've done for years with a rotary cutter and an iron. Now, if they had condensed this all into one machine that did all three operations I might be interested. They'd have to lower the price considerably below $200 though.

I spend a lot of time at the fabric store, usually looking for something they don't have, which is not their fault; the chains have taken over all the little mom and pop stores that carried more than the "top ten" of sewing supplies. Anyway, one of the staff came over to find out what craziness I was up to this time.

I am astounded to learn that people are actually afraid to make bias tape. Turns out they get quite a few people who don't find the color seam binding they're looking for. So the staff says "make your own" and the customer gives them that deer in the headlights look and the conversation kinda dies off at that point. I was told that one customer even stated that homemade bias tape won't turn corners so store bought was better. Wow. The only thing I can think of is that she was trying to turn a really tight corner, or the fabric was cut on the straight of grain instead of on the bias, which of course is how bias tape got its name in the first place.

Okay, in all fairness, if you use miles and miles of bias tape I can see where investing that much moolah could be worth it. But realistically, how many of use really use that much of the stuff at any one time? A king sized quilt uses about 12 feet, and how many of those have you made recently?

Yes it's allegedly faster. Although I haven't used one, the label says 12 feet of bias tape in about 6 minutes. But again, how often do you make a continuous strip that long? Most of what I do is much, much shorter and easy with my trusty iron. The occasional steamed finger is an occupational hazard, like getting poked with a needle or being covered in lint and thread snippets.

There are a gazillion tutorials on how to make bias tape out there. I put the question to Google and got 800,000 results. Funny, Simplicity's machines are at the top of the list. There are even YouTube videos for those of us who like those better than static pictures. Just type "how to make bias tape" into your browser search.

I'm all for invention and innovation - I actually admire the creativeness and marketing campaign! Just not at that price for something this simple

Monday, April 25, 2011

Funky Little Flower Looms


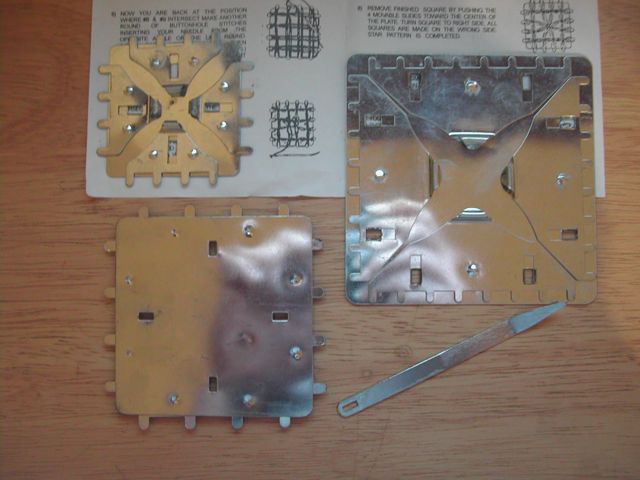
So I found this little box of looms in a thrift shop this weekend and am stumped on when they were made. They appear to be some sort of flower looms, but not like I’ve ever seen before. There’s not a single identifying mark or logo on any of them. The box says made for Carol Wright Gifts, but they’re not in the current catalog and I seem to remember that Carol Writght Gifts has been around for a loooong time.

They’re all square, about 2”, 3” and 4” respectively. The teeth slide in and in the photo the largest and smallest show the back side while the 3” one shows the side you’d be working on. The instruction sheet is in there, but again, no identifying info.

Anyone seen these before? Thanks


Wednesday, October 27, 2010

Vintage Strawberry Pincushion Ebay Treasure!

This gorgeous bunch of white strawberries is up on ebay and I dearly wish I could afford them! I'm not sure if they're intended as decoration or as a functioning pincushion, but either way, wouldn't they look great on your sewing table? Here's the link to the listing, which is almost over, so go quick!

Now, since I really can't buy them right now, but of course I just have to have them anyway, I came up with my own version.

Turns out a strawberry is a pretty easy thing to make. Just a half circle of fabric sewn up the side and gathered at the top. The original used white velvet, but naturally I don't have any on hand so I used this cotton print.

First thing to do is cut out 2 circles 3 1/2" in diameter. Fold one in half and cut along the fold. Take one of those halves and trim it down to about a 2 1/2"
diameter. Take the other circle and trim it down to a 3" diameter, then fold it in half and cut it along the fold too. Okay, I cut mine wrong. Creative license! Each half circle makes one berry, and you want 1 large one, 2 medium ones and a small one.

Next you'll fold each piece in half again (right sides together) and sew along the straight open edge with a 1/4" seam. (I used black thread so you could see). If you want rounded tips on your berries instead of the pointy ones shown, round off the end of your seam. You want to use a fairly small stitch length on your machine, or a small backstitch if you're doing this by hand.

Turn them all right sides out and run a small gathering stitch around the open tops. Use a fairly long length of thread. Stuff VERY firmly. You can always get a little more in! Draw up the gathering stitches and shape your berry as you go. When each one is stuffed, sew the top closed and knot the thread, but don't cut it.

Now, take the tail of thread and a bunch of seed beads and sew seeds all over your berries. I always seem to sew things in straight lines, but you want to make them as random as possible. Sew on as many or few as you want. When you're happy with it, run the thread to the top of the berry, knot it off and cut it. Do this with all of your berries.

The calyx on the original is just a square of velvet ribbon. Another thing I don't have on hand, so I used felt. You need a 1/2" square for the smallest berry, 3/4" for the largest berry and 5/8" for the medium berry. Cut 4 12" lengths of embroidery floss and tie a big knot in one end of each one. Using a needle, run the other end through the center of each calyx, then sew the calyx on the berry. When they're all done, hang the berries from one hand and adjust the lengths of the embroidery floss until you're happy with how they hang. Tie a knot on the other end to keep them in place while you make a bow.

Still no velvet ribbon so I used some 7/8" satin ribbon in a really pretty shade of apple green. Cut 2 pieces each about 9" long. Take one piece of ribbon, overlap the ends about 1/2" and sew together. Bring the center of the loop to the sewn join and wrap the thread around it several times. Knot the thread but don't cut it. Take the other piece of ribbon and, with the same thread, do a running stitch up the center going across the short width. Push this up to the loops, draw up and wrap the thread around the whole thing a few time. Then knot securely and cut the thread.

Being really sure not to lose your spacing, carefully untie the knot in the embroidery floss on the strawberries. Keeping the strands of floss parallel, lay the bunch of strawberries on top of your ribbon bow and wrap the floss over the thread wrappings. I went once on each side of the bunch, then once between the outer most berry and the next in, again, on both sides. This seems to keep them from tangling with each other quite so much. Carefully lay the whole thing down, back side up.

With an embroidery needle, knot off each strand of embroidery floss. Trim the ends of the ribbon and treat with fray check or something to prevent fraying. Right about now I suddenly realized that this would make an awesome pin for quilting or embroidery get togethers. Sure enough, no pinbacks in the stash, so I'm using a safety pin for now.

This and other great vintage patterns can be found at PatternsAlaCarte on Etsy, click on one of the little samples at the bottom of the page.

Thursday, August 26, 2010

Birth of a Pattern

Birth of a Pattern

So last Christmas a customer contacted me with a sad story. Seems that she had made a felt applique Christmas wall hanging years ago and it had eventually wound up at her sister’s home. Well, I’ve made a few of those Bucilla felt ornaments over the years and it turns out that eventually they just disintegrate. I myself actually just tossed a couple of very cute little Christmas mice I had made back in 1998. Things were just falling apart. Turns out the sister felt the same way about the
wall hanging, so off to the trash it went. Not her fault really, most non-needleworkers just don’t see the value in keeping something that tattered - how was she to know it was still valuable as a template for a new pattern? So this nice lady contacted me to see if just maybe I had the pattern in my stash.

I spent a couple of days looking through all my old magazine, then a couple of weeks searching the internet, all with no luck. I did finally run across a Christmas tree skirt that looked like it might match the description and she said it was remarkably close. More hunting on the internet and darn if I can’t find the thing anywhere. The picture I found was for an item that had sold and was actually regular applique, not the felt. I finally just took a deep breath and decided to recreate the pattern from the (distorted) picture. Lots and lots of fiddling and I finally came up with line drawings for each of the 12 Days of Christmas based on that old tree skirt.

Now, 1970 was not my favorite decade at the time, and let’s face it, bell bottom hip huggers (aka low rise) jeans look good on remarkably few people. The colors for the period are all wrong for me. I do think lime and apricot go well together, just not as MY clothing! I’m still not sure about red and pink, but hey, it actually seems to work for these little birds. It’s good for me to work in a different palette though, or else I’d make everything in blue, grey, black and pastel pink. And even though the original picture was fuzzy on the details it did provide good color direction. I figured out how to cut out all the little felt pieces using the Heat n Bond after doing the first Day. Those little pears just about drove me nuts! The bonus with Heat n Bond is that you also get to do away with pinning anything and get right to the embroidery.

I’m looking forward to putting this one up on Patterns ala Carte just to see how many people tell me it reminds them of the old one. And I can almost guarantee that someone somewhere has that old magazine pattern, so maybe it’ll come to light too. I’d love to see how close I got to the original!